cayenne
is one Smokin' Farker
- Joined
- Jun 12, 2004
- Location
- New Orleans
Hello all,
Well, I was able to FINALLY get things going on the new BlueSmoke Smoker offset unit.
Let's start with Friday afternoon, I figured I'd just do something easy, I'd spray the inside down real good with a Pam like cooking oil spray, and then build a hot fire and "season the inside" of the smoker.
The first positive...I got to seriously play with FIRE!!
Here's a quick link to a very short YouTube video....no tripod, balanced on a box, hand held...just iPhone video, but shows me playing with the "flame thrower"...
https://www.youtube.com/watch?v=qDK_WRe9mVM
(Whew...I've gained weight sure, but that angle REALLY makes me look fat!! Lol)
I went and actually measured my splits...they range in length from 18" to close to 24" on some of them, so average I'd say was about 22". Longer than I'd thought, and I had a VERY hard time fitting them in there in any lattice type stack for good fire building.
I torched and torched and use those little rolls of fire starters, and as you can see it was getting dark before any of the wood smoldered long enough to break into coals and would then ignite and burn other logs faster.
But I got my burn in done.
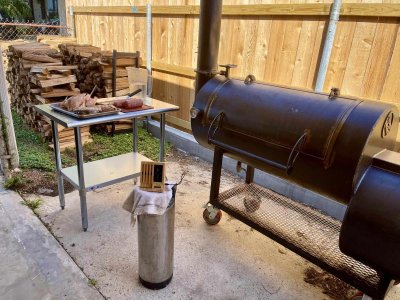
I got up early Saturday and figured I'd try to do something to make sure fire wasn't my main problem on cook day with a brisket, fatties, chicken and home cured bacon on the line.
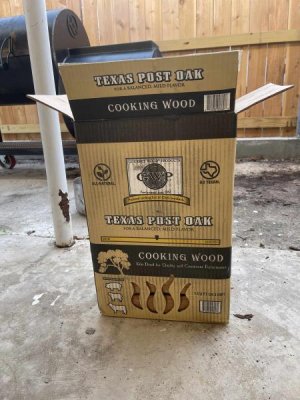
I ran to local Sports Academy and bought about 4x boxes of wood splits...pricey yes, but cut to a nice manageable short length.
(by the way, I bought and received late Sunday a saw I think will do for cutting my firewood into better lengths: The Black and Decker Lopper : https://www.amazon.com/dp/B000BANMUY)
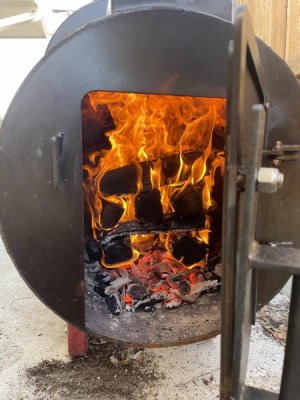
So, back to Sunday morning. Much as I wanted to get an EARLY start, I slept in a bit. I decided I'd start a BIG fire with new wood and with a good bit of lump charcoal in there to form a good coal bed right off to bat.
Well, the fire roared, the store bought wood was great...trouble is, too well...that thing shot up to well over 325F or so...and only time would let it burn back down to the 220F's...(which I actually overshot there too, but no big deal)...
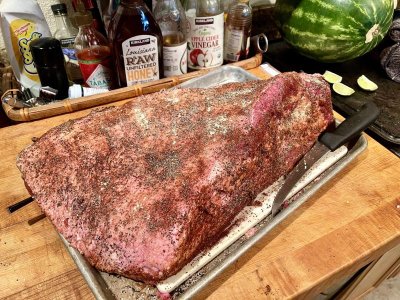
I got my Costco Prime Brisket out and while smoker was "cooling" I re-watched a number of videos how to trim a brisket (in the past I just threw them on as is).
So, I got my new Victorinox 6 Inch Curved Fibrox Pro Boning Knife, and went to town.
I think I got it fairly aero dynamic, and good fat cut off...at least not bad for a first effort.
I saved the really fatty parts in a metal bowl to put in smoker to render into smoked beef tallow (and used a bit to wrap my brisket).
I put the heater + fat scraps in a freezer ziplock to save till I have enough to grind into brisket burger or sausage.
I plugged in the MEATER block first 2 probes into the brisket, one in flat other in point and put it on the smoker.
I was a bit shocked that for about half the cook, the flat, which was not far from the smoke collector was a good bit HOTTER than the point, which was facing the firebox, and just shy of midway of the cook chamber.
Anyway...I spent the day trying to get a feel for when and how much to add to keep temps. It varied a LOT all day...but towards the end I started to get a feel for it. I even managed to squeeze in a few of the regular firewood logs.
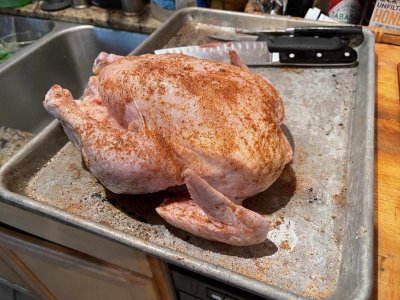
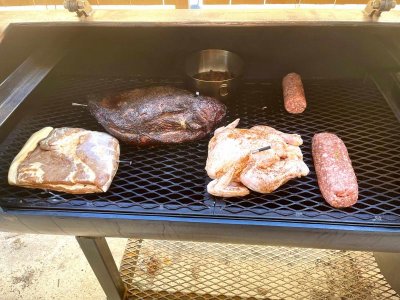
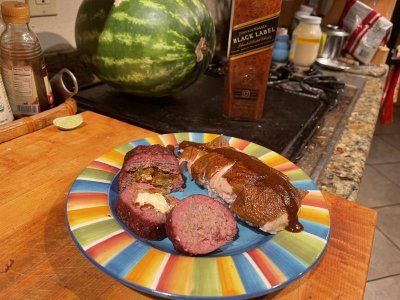
Brisket in first....I followed by adding a whole chicken, that I just quickly seasoned with Tony Chacherie's Creole seasoning (ubiquitous down here in southern Louisiana)....and half a pork belly that I'd cured awhile back but wrapped and froze instead of smoking.
I put half that on too.
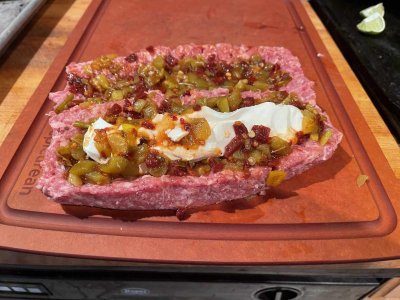
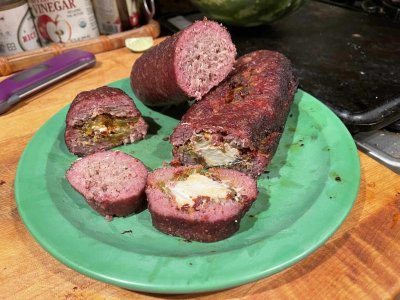
And due to suggestions for many here, I attempted really my first "fatties". I had regular breakfast sausage...and first one I just did plain...no rub, nothing...to give myself a baseline to know what it does.
The other, I split in half...I smooshed and dug a pit in middle, and put half a thing of cream cheese in there and also a mixture of green canned chiles and some chopped up canned chipotles...then resealed the sausage back into a chub shape.
I put my water pan in too.
So, I had a pretty full beast....but not crowded.
The MEATER probes, with giving not only internal temps, but reporting on external temps of the smoker with the placement in various parts of the unit, gave me a good image of how the heat distributes...and once the whole smoker came up to temp, I"m happy to say it seems pretty darned even!! I guess it takes a bit for the 3/8' steel all around to come to temp, but once it does...it holds pretty good I think.
My smoke, could have been a bit dirtier at first...I wanted to, but it seem mostly clean whole cook. I think that's really reflected by the light tan color of the chicken which went in last 4 hours of cook.
So far results:
Chicken - Could use a bit more smoke flavor, but VERY juicy and tender...
Fatties - Both had great flavor, but, I think I should have removed them earlier, just a little dry. That stuffed one was great!! I'm going to really play with stuffing them in the future.
Bacon - I put this in fridge to firm. A few years back at an auction I scored a real, full sized Hobart deli meat slicer. I'll slice it into bacon. I've never before cured and then froze the bellies before...so, will be interesting how this affects flavor and texture. I got the cure plan from this site long ago...and it worked in the past....
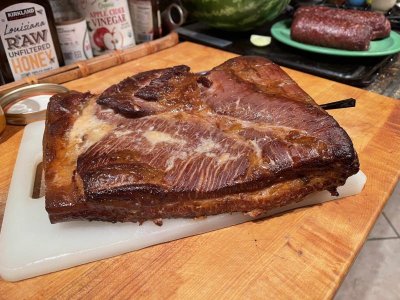
Brisket - Well, I'm not up on the "feel" thing yet, but it seemed to be good as I could tell....I watched temps, wrapped in butcher paper (first time)...and by temperature this thing was only about 8 hours!!
This was a LARGE piece of meat too...before trimming about 15lbs.
Last night about 8-9pm I took the brisket off the smoker, leaving wrapped and put into a Coleman ice chest lined with towels.
In a bit for late lunch I plan to unpack and slice it up to see how I did. I'll send pics of that too later on this thread.
As mentioned earlier, I was a bit shocked and worried that on onset, the flat end near the collector...was MUCH hotter than the point end...and it appeared to shrink a great deal more than the rest of the brisket, and maybe due to me seeing one trimmed which I'd not done before. I hope I didn't overdo that too much, but will see.
Anyway...overall, VERY happy with cook...and new smoker. I did notice, while cooking that there's a huge dent in my smoke stack, above where it folds...I'm going to write to Phil about that....not sure if that impedes airflow and draw...
And I've got to solve this wood problem. I dunno at this time if the wood I got locally is just too green...or if the lengths are too much and not being able to properly stack it in firebox is the problem.
I'll test later this week with the new saw and get that variable out of the way.
Anyway...pictures below.
All comments and suggestions GREATLY appreciated!!
BUT, man, I had problems getting the darned first to start with the firewood I ordered.
Well, I was able to FINALLY get things going on the new BlueSmoke Smoker offset unit.
Let's start with Friday afternoon, I figured I'd just do something easy, I'd spray the inside down real good with a Pam like cooking oil spray, and then build a hot fire and "season the inside" of the smoker.
The first positive...I got to seriously play with FIRE!!
Here's a quick link to a very short YouTube video....no tripod, balanced on a box, hand held...just iPhone video, but shows me playing with the "flame thrower"...
https://www.youtube.com/watch?v=qDK_WRe9mVM
(Whew...I've gained weight sure, but that angle REALLY makes me look fat!! Lol)
I went and actually measured my splits...they range in length from 18" to close to 24" on some of them, so average I'd say was about 22". Longer than I'd thought, and I had a VERY hard time fitting them in there in any lattice type stack for good fire building.
I torched and torched and use those little rolls of fire starters, and as you can see it was getting dark before any of the wood smoldered long enough to break into coals and would then ignite and burn other logs faster.
But I got my burn in done.
I got up early Saturday and figured I'd try to do something to make sure fire wasn't my main problem on cook day with a brisket, fatties, chicken and home cured bacon on the line.
I ran to local Sports Academy and bought about 4x boxes of wood splits...pricey yes, but cut to a nice manageable short length.
(by the way, I bought and received late Sunday a saw I think will do for cutting my firewood into better lengths: The Black and Decker Lopper : https://www.amazon.com/dp/B000BANMUY)
So, back to Sunday morning. Much as I wanted to get an EARLY start, I slept in a bit. I decided I'd start a BIG fire with new wood and with a good bit of lump charcoal in there to form a good coal bed right off to bat.
Well, the fire roared, the store bought wood was great...trouble is, too well...that thing shot up to well over 325F or so...and only time would let it burn back down to the 220F's...(which I actually overshot there too, but no big deal)...
I got my Costco Prime Brisket out and while smoker was "cooling" I re-watched a number of videos how to trim a brisket (in the past I just threw them on as is).
So, I got my new Victorinox 6 Inch Curved Fibrox Pro Boning Knife, and went to town.
I think I got it fairly aero dynamic, and good fat cut off...at least not bad for a first effort.
I saved the really fatty parts in a metal bowl to put in smoker to render into smoked beef tallow (and used a bit to wrap my brisket).
I put the heater + fat scraps in a freezer ziplock to save till I have enough to grind into brisket burger or sausage.
I plugged in the MEATER block first 2 probes into the brisket, one in flat other in point and put it on the smoker.
I was a bit shocked that for about half the cook, the flat, which was not far from the smoke collector was a good bit HOTTER than the point, which was facing the firebox, and just shy of midway of the cook chamber.
Anyway...I spent the day trying to get a feel for when and how much to add to keep temps. It varied a LOT all day...but towards the end I started to get a feel for it. I even managed to squeeze in a few of the regular firewood logs.
Brisket in first....I followed by adding a whole chicken, that I just quickly seasoned with Tony Chacherie's Creole seasoning (ubiquitous down here in southern Louisiana)....and half a pork belly that I'd cured awhile back but wrapped and froze instead of smoking.
I put half that on too.
And due to suggestions for many here, I attempted really my first "fatties". I had regular breakfast sausage...and first one I just did plain...no rub, nothing...to give myself a baseline to know what it does.
The other, I split in half...I smooshed and dug a pit in middle, and put half a thing of cream cheese in there and also a mixture of green canned chiles and some chopped up canned chipotles...then resealed the sausage back into a chub shape.
I put my water pan in too.
So, I had a pretty full beast....but not crowded.
The MEATER probes, with giving not only internal temps, but reporting on external temps of the smoker with the placement in various parts of the unit, gave me a good image of how the heat distributes...and once the whole smoker came up to temp, I"m happy to say it seems pretty darned even!! I guess it takes a bit for the 3/8' steel all around to come to temp, but once it does...it holds pretty good I think.
My smoke, could have been a bit dirtier at first...I wanted to, but it seem mostly clean whole cook. I think that's really reflected by the light tan color of the chicken which went in last 4 hours of cook.
So far results:
Chicken - Could use a bit more smoke flavor, but VERY juicy and tender...
Fatties - Both had great flavor, but, I think I should have removed them earlier, just a little dry. That stuffed one was great!! I'm going to really play with stuffing them in the future.
Bacon - I put this in fridge to firm. A few years back at an auction I scored a real, full sized Hobart deli meat slicer. I'll slice it into bacon. I've never before cured and then froze the bellies before...so, will be interesting how this affects flavor and texture. I got the cure plan from this site long ago...and it worked in the past....
Brisket - Well, I'm not up on the "feel" thing yet, but it seemed to be good as I could tell....I watched temps, wrapped in butcher paper (first time)...and by temperature this thing was only about 8 hours!!
This was a LARGE piece of meat too...before trimming about 15lbs.
Last night about 8-9pm I took the brisket off the smoker, leaving wrapped and put into a Coleman ice chest lined with towels.
In a bit for late lunch I plan to unpack and slice it up to see how I did. I'll send pics of that too later on this thread.
As mentioned earlier, I was a bit shocked and worried that on onset, the flat end near the collector...was MUCH hotter than the point end...and it appeared to shrink a great deal more than the rest of the brisket, and maybe due to me seeing one trimmed which I'd not done before. I hope I didn't overdo that too much, but will see.
Anyway...overall, VERY happy with cook...and new smoker. I did notice, while cooking that there's a huge dent in my smoke stack, above where it folds...I'm going to write to Phil about that....not sure if that impedes airflow and draw...
And I've got to solve this wood problem. I dunno at this time if the wood I got locally is just too green...or if the lengths are too much and not being able to properly stack it in firebox is the problem.
I'll test later this week with the new saw and get that variable out of the way.
Anyway...pictures below.
All comments and suggestions GREATLY appreciated!!
BUT, man, I had problems getting the darned first to start with the firewood I ordered.
Attachments
-
 IMG_9428.jpg52.9 KB · Views: 204
 -
 IMG_9430.jpg47.6 KB · Views: 203
 -
 IMG_9432.jpg143.4 KB · Views: 203
 -
 IMG_9435.jpg79.6 KB · Views: 203
 -
 IMG_9436.jpg97.3 KB · Views: 203
 -
 IMG_9437.jpg103.2 KB · Views: 204
 -
 IMG_9439.jpg98.5 KB · Views: 202
 -
 IMG_9441.jpg94.7 KB · Views: 200
 -
 IMG_9443.jpg84.5 KB · Views: 203
 -
 IMG_9445.jpg82.7 KB · Views: 203


")

