Weber 26.5 DIY Table Question

AKMIMNAK

is one Smokin' Farker
Joined
Aug 2, 2017
Location
Alaska
Name or Nickame
Jonathan
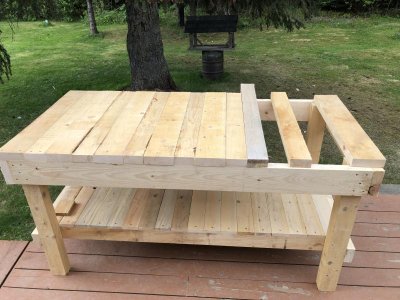
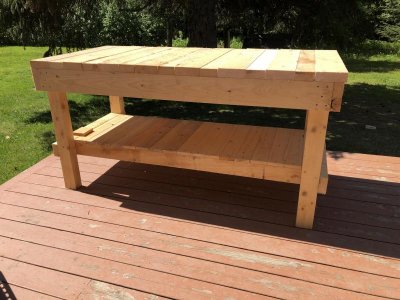
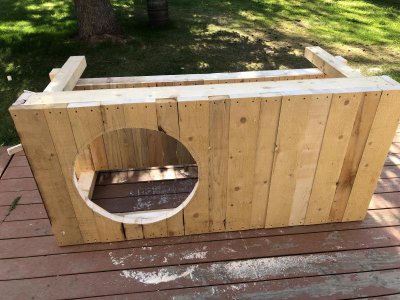
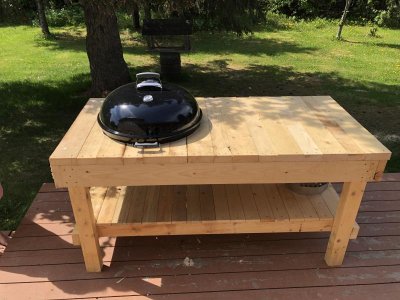
Building an outdoor grilling table for my new 26.5 out of local sawmill lumber.

What diameter would you cut the hole?

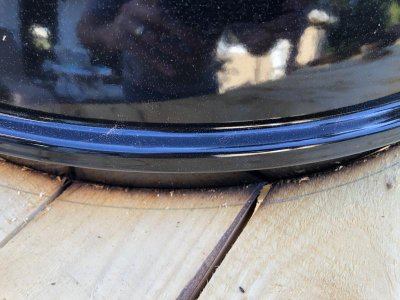
I am not planning to use screws or brackets at this point to seat the grill into the wooden table. I've seen others just drop it into place and say it does not burn the wood up. (If you have experience otherwise, please say so!)

Thank you for the help!
 

Attachments

  • IMG_3030.jpg
    IMG_3030.jpg
    79 KB · Views: 285
I've never done it, but I suspect that the wood in contact with the grill body will get charred. Probably not going to burn but I think an air gap is a good choice. I'm sure there are many ideas of how to do so on the net.

That's gonna be a great looking table. Can't wait to see it's completion. :thumb:
 
I think you're going to have to figure out how much space you'll need to get your ash catcher out. That being said may a little smaller than your charcoal grate???
 
I refurbished a table for a 22 inch Weber - I left a 1/2 inch gap between the kettle and the table - mine is mounted to the table with two brackets

I also put some thin metal flashing between the kettle and the table -

I have not had any issue with charring
 
Thanks guys! Much appreciated. Maybe I will create a gap or barrier then. Yes, will be sealing it. Didn’t want manufactured boards. Wanted to have fun with beefy local sawmill lumber using local spruce logs. It’ll last as long as I do.
 
Updated progress photos. Not sanded or stained yet. Any tips welcome.
 

Attachments

  • 24DA71F1-44DE-4E72-B477-F3094DEC7DB2.jpg
    24DA71F1-44DE-4E72-B477-F3094DEC7DB2.jpg
    76.9 KB · Views: 126
  • F04392B9-3035-4FEB-8BA7-20B107B4B32C.jpg
    F04392B9-3035-4FEB-8BA7-20B107B4B32C.jpg
    89.9 KB · Views: 126
Looks pretty good. Whatever you stain it with, be prepared to redo every couple years. Can't tell from your pics, but I would have left a gap between each board to allow for swelling when it gets wet. Think picnic table.

I have a workbench with 4X4 legs and it has square rubber pads under the legs. Something that I found at Home Depot.

I have a small deck and I like to keep things mobile. Everything is on wheels. That table probably weighs a bit, so if you're interested look up Foot Master casters.

That's a great point on the gaps, I didn't think of that. I really wanted them tight because I want the bottom shelf to be relatively dry storage, especially if I enclose the right end with a cabinet someday. I am hopeful that since the lumber is relatively green it will not swell much. Frankly, it should shrink first, and then if it swells later, it will not be bigger than it is now. Hopefully? Spitballing there.
 
My main concern at this point after the first cook is that it definitely charred the wood closest to the hot spot on the grill. So I am def going to need to do something.

I think I want it to sit just a hair lower too, so I will likely cut the hole again slightly larger, sand it, and then use screws or a gasket to protect the wood.
 

Attachments

  • IMG_3135.jpg
    IMG_3135.jpg
    73.2 KB · Views: 93
That's a great point on the gaps, I didn't think of that. I really wanted them tight because I want the bottom shelf to be relatively dry storage, especially if I enclose the right end with a cabinet someday. I am hopeful that since the lumber is relatively green it will not swell much. Frankly, it should shrink first, and then if it swells later, it will not be bigger than it is now. Hopefully? Spitballing there.

The top is going to self destruct. You pinned the slats with 2 fasteners each end and they will try to prevent wood movement. The forces of expansion and contraction are very powerful. The bottom is correct, with one fastener in the center. I've never built with green wood so I can't comment on if they'll expand beyond what they are now. I have built with kiln dried Home Depot boards and have experienced some disasters if I didn't follow the "rules".
 
The top is going to self destruct. You pinned the slats with 2 fasteners each end and they will try to prevent wood movement. The forces of expansion and contraction are very powerful. The bottom is correct, with one fastener in the center. I've never built with green wood so I can't comment on if they'll expand beyond what they are now. I have built with kiln dried Home Depot boards and have experienced some disasters if I didn't follow the "rules".

What are the "rules"? I honestly thought the bottom was incorrect because one screw in the center could cause it to split and wing up. But I did it anyways trying to save screws and was just really careful driving them in.

How should I have done the top?
 
I left a gap when I made mine:

picture.php
 
Back
Top