Hopefully no one has to do this. Leave it to Shirley Fabrication when purchasing your smoker. Unfortunately I'm 1,035 miles away and I'm the second owner of the pit. So I was on my own. I thought I'd share the process with you guys.
I think the hardest part was cutting into the smoker. Once you make that first cut its no turning back. Which wasn't terrible. It gave my Dad an excuse to pull out his plasma cutter and play around.


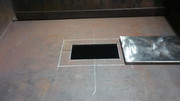
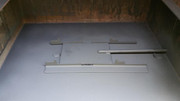
The next part was making the rails for the damper. The bottom of the warming box sees all kinds of high heat from the firebox below. So the top of the firebox/warming box has a bunch of play in it. So welding a flat piece of angle iron on a piece of steel that isn't flat wasn't going to necessarily work all that well. (Another reason to have Shirley Fabrication do this when when everything is straight and true) So my Dad, brother in law, and I thought we could cut some angle iron down and shape it to the floor. This way we could open of the sides of the glides for more heat and still have the damper stay in place.

After figuring out the glides we made a handle and welded on the damper.


After welding in the glides and stops, we turned the warming box into a makeshift spray booth.
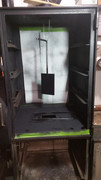
Here's a pic of the heat deflector in place.


The handle and block plate getting put together.


Sunday morning I fired it up to burn off the paint. Sunday evening I played around with it. The heat seems consistent from side to side. The block plate looks to be doing its job when around 350 degress in the warming cabinet.


Food time!

I'm glad to have it done. It will be a nice addition to the smoker. I still need some more time to play around with it yet. A big thank you to my Dad and brother in law for the tools and brains to put this together.
Thanks for looking.
I think the hardest part was cutting into the smoker. Once you make that first cut its no turning back. Which wasn't terrible. It gave my Dad an excuse to pull out his plasma cutter and play around.
The next part was making the rails for the damper. The bottom of the warming box sees all kinds of high heat from the firebox below. So the top of the firebox/warming box has a bunch of play in it. So welding a flat piece of angle iron on a piece of steel that isn't flat wasn't going to necessarily work all that well. (Another reason to have Shirley Fabrication do this when when everything is straight and true) So my Dad, brother in law, and I thought we could cut some angle iron down and shape it to the floor. This way we could open of the sides of the glides for more heat and still have the damper stay in place.
After figuring out the glides we made a handle and welded on the damper.
After welding in the glides and stops, we turned the warming box into a makeshift spray booth.
Here's a pic of the heat deflector in place.
The handle and block plate getting put together.
Sunday morning I fired it up to burn off the paint. Sunday evening I played around with it. The heat seems consistent from side to side. The block plate looks to be doing its job when around 350 degress in the warming cabinet.
Food time!
I'm glad to have it done. It will be a nice addition to the smoker. I still need some more time to play around with it yet. A big thank you to my Dad and brother in law for the tools and brains to put this together.
Thanks for looking.


