Very Nice. Enjoying your Progress
THE BBQ BRETHREN FORUMS
You are using an out of date browser. It may not display this or other websites correctly.
You should upgrade or use an alternative browser.
You should upgrade or use an alternative browser.
BBQ Island Build
- Thread starter geoff7877
- Start date
Tango Joe
is Blowin Smoke!
- Joined
- May 6, 2011
- Location
- Sound Beach, Long Island, NY
This is going to be grand, nice work!
geoff7877
Full Fledged Farker
- Joined
- Feb 20, 2016
- Location
- Petaluma, CA
Either way you go, I highly recommend getting a pizza oven. You can literally cook anything in there.Nice! Looking forward to seeing the progress.
I remember the pizza oven build— though in my case rather than providing inspiration to consider trying it myself it made me realize that I’d need to save up some $$ to buy one if I was going to get one.
geoff7877
Full Fledged Farker
- Joined
- Feb 20, 2016
- Location
- Petaluma, CA
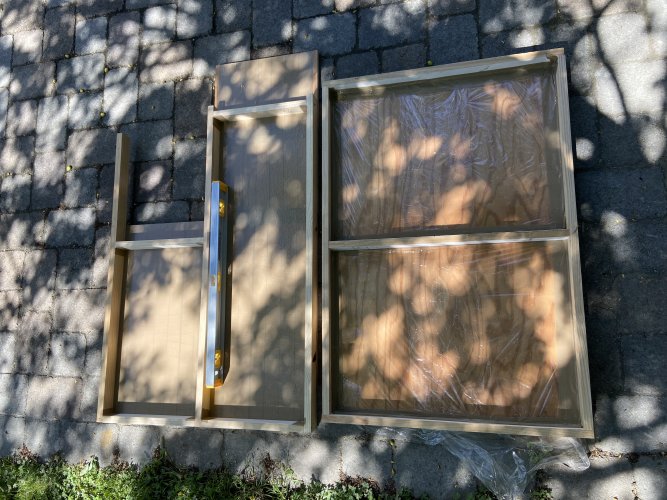
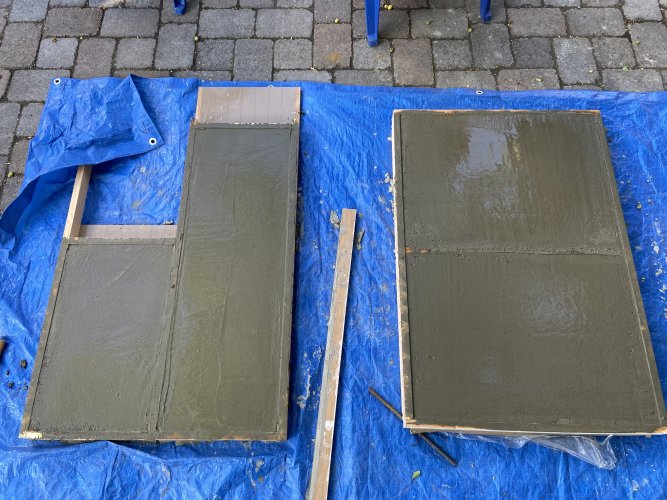
Put my forms together to pour my slabs for the floor, back wall and side wall of the grill. The bricks that are already in place are the other side wall and front wall. Again, the floor and walls will be lined with fire bricks.
Stacked 2 rows of blocks to support the floor slabs. Flipped both top blocks on the side to allow airflow in and out to keep the heat down. The blocks closest to the camera will also be the interior wall of my storage area.
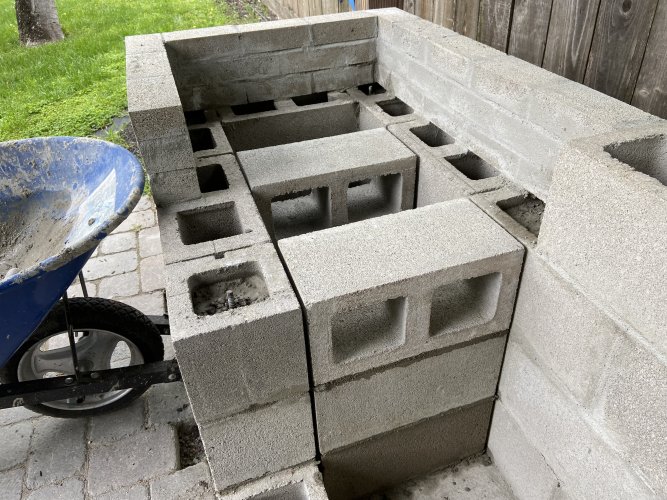
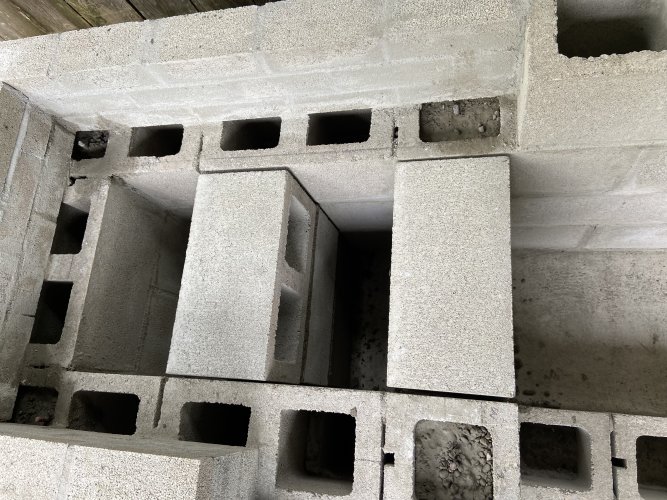


Stacked 2 rows of blocks to support the floor slabs. Flipped both top blocks on the side to allow airflow in and out to keep the heat down. The blocks closest to the camera will also be the interior wall of my storage area.


- Joined
- Apr 21, 2006
- Location
- Lake Ponderosa-Montezuma, IA
The cool thing (from experience) is that you have this thing completely finished in your head, but we just don't see it but little by little it's becoming a thing!
Ed
Ed
Very nice. You do really nice work
geoff7877
Full Fledged Farker
- Joined
- Feb 20, 2016
- Location
- Petaluma, CA
For sure. And I’ve made a lot of changes of how I thought it would go as it progresses. I can plan and plan but don’t learn until I can feel it with my hands and watch it come together. I really love the process and love seeing it come together.The cool thing (from experience) is that you have this thing completely finished in your head, but we just don't see it but little by little it's becoming a thing!
Ed
geoff7877
Full Fledged Farker
- Joined
- Feb 20, 2016
- Location
- Petaluma, CA
Thank you so much. I really appreciate that.Very nice. You do really nice work
geoff7877
Full Fledged Farker
- Joined
- Feb 20, 2016
- Location
- Petaluma, CA
Thank you so much.Nice job!
geoff7877
Full Fledged Farker
- Joined
- Feb 20, 2016
- Location
- Petaluma, CA
I hope so!This is going to be grand, nice work!
geoff7877
Full Fledged Farker
- Joined
- Feb 20, 2016
- Location
- Petaluma, CA
More coming soon.Very Nice. Enjoying your Progress
geoff7877
Full Fledged Farker
- Joined
- Feb 20, 2016
- Location
- Petaluma, CA
After the slabs cured and sat in the molds for a few days, I de molded them to get them set in place.
At this point of the build, I experienced my first in a series of COMPLETE MORON rookie mistakes. When removing the molds, I knocked off the upper right hand corner of the upper slab. Not the end of the world… When I say “knocked off”, I mistakenly took off the upper corner, but slab was still in great shape. I stress the word “WAS”…
Thankfully, I had the presence of mind to pour two separate slabs instead of one big slab. Lighter, Easier to manage and easier to set in place.
When I was installing the first slab (upper in picture) I realize that I made the slab the exact same width as the opening. On one hand, I was impressed that I actually measured so precisely. One the other hand, I realized that I needed the slab at least 1/8” more narrow to fit it between the walls. Of course I realize this in the moment, as I’m trying to make this thing fit.
At this point, the slab is now stuck between the walls about halfway down, so what do I do? Break out the rubber mallet to try tapping this thing into place. I finally got it into place, but it’s not perfectly level. I mortared underneath, and started trying level it with my rubber mallet. WELL, I cracked the corner on the inner edge. Conitinuing on with my complete lapse of reason, I continued on. The slabs are reinforced with wire mesh, I have them fully supported and they’re going to be covered with fire brick anyway, so I patched it up and moved on. (See attempted patchwork with darker concrete…)
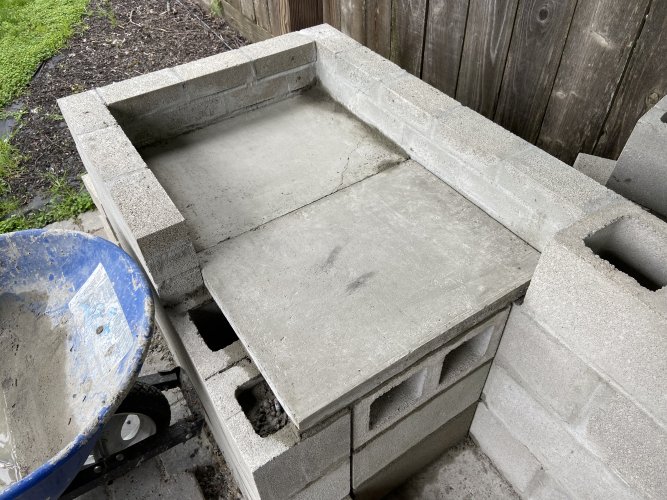
So slabs are in, repairs are made and even though it was a little rocky, I felt good about moving on, considering the circumstances. I did a dry fit with the fire bricks and realized that the top of the fire bricks are about 3/8” higher than my measurements. I quadrupled my measurements here BEFORE pouring my slabs, because everything has to line up at the top so the cement board will lay perfectly flat on top. After going through every scenario in my head, I realize that I had intended to use masonry construction adhesive under the slabs instead of a 3/8” bead on mortar. But now, I have one slab that I forced into place and both are now mortared in. What’s done is done, so I resigned to the fact that I’m just going to have to cut the whole top layer of fire bricks. I walked away and after 20 minutes, I decided to remove the slabs out and take out the mortar. In the moment, this was a huge pain in the ass, but would me save a ton of time with cutting bricks and risk damaging fire bricks that are $3.10 each!!!
Pulled the first slab and scraped off the mortar. Tried removing the jammed in slab and that thing was STUCK! Pulled out the pry bar and got enough clearance to squeeze in there with a flathead screwdriver and scrape off the mortar. Scraping away at a slab that’s propped up just high enough to fit my forearm in there and I dropped my screwdriver down into the hole under the slab. Oh well! Not getting that screwdriver back.
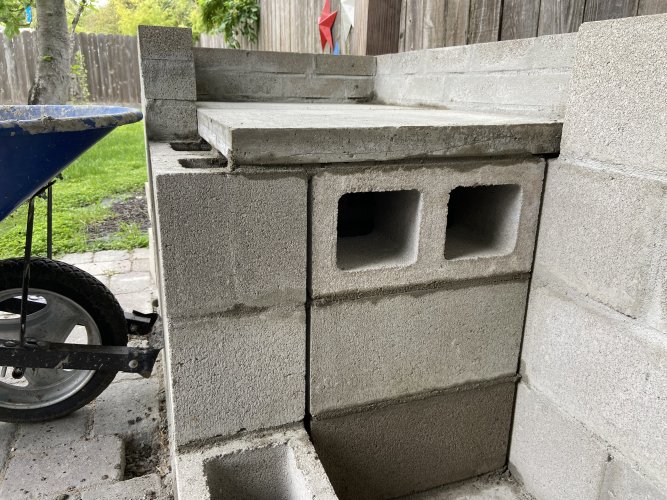
Finished scraping and decided to hang this up for the day to regroup before making any more stupid moves. With one slab removed and the other stuck between the walls once again, I hear a loud “POP!!!” The pressure of the stuck slab broke the mortar joints… Thankfully, it was a clean break and could be easily repaired. Even though this was a HORRIBLE day from start to finish, I’m happy that it happened considering the fact that I had a damaged slab stuffed into place. Pulled out the damaged slab, destroyed it and started the process of pouring another slab. And I got my screwdriver back!
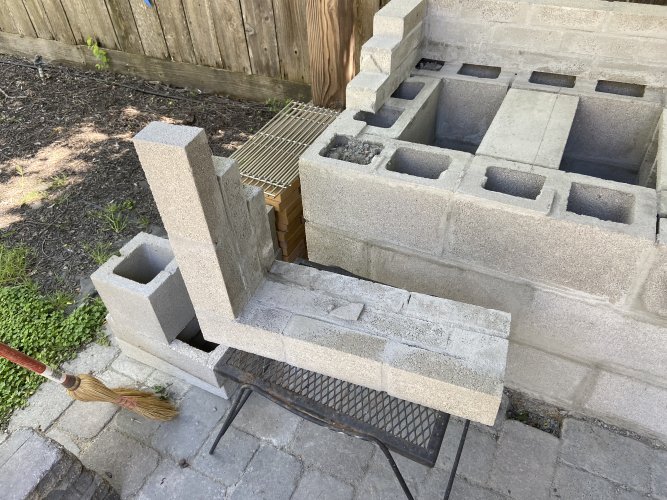
Moral of the story, stop when things start turning to S@#&! Hopefully this was an isolated day of horrible circumstances…
Moving on…
At this point of the build, I experienced my first in a series of COMPLETE MORON rookie mistakes. When removing the molds, I knocked off the upper right hand corner of the upper slab. Not the end of the world… When I say “knocked off”, I mistakenly took off the upper corner, but slab was still in great shape. I stress the word “WAS”…
Thankfully, I had the presence of mind to pour two separate slabs instead of one big slab. Lighter, Easier to manage and easier to set in place.
When I was installing the first slab (upper in picture) I realize that I made the slab the exact same width as the opening. On one hand, I was impressed that I actually measured so precisely. One the other hand, I realized that I needed the slab at least 1/8” more narrow to fit it between the walls. Of course I realize this in the moment, as I’m trying to make this thing fit.
At this point, the slab is now stuck between the walls about halfway down, so what do I do? Break out the rubber mallet to try tapping this thing into place. I finally got it into place, but it’s not perfectly level. I mortared underneath, and started trying level it with my rubber mallet. WELL, I cracked the corner on the inner edge. Conitinuing on with my complete lapse of reason, I continued on. The slabs are reinforced with wire mesh, I have them fully supported and they’re going to be covered with fire brick anyway, so I patched it up and moved on. (See attempted patchwork with darker concrete…)

So slabs are in, repairs are made and even though it was a little rocky, I felt good about moving on, considering the circumstances. I did a dry fit with the fire bricks and realized that the top of the fire bricks are about 3/8” higher than my measurements. I quadrupled my measurements here BEFORE pouring my slabs, because everything has to line up at the top so the cement board will lay perfectly flat on top. After going through every scenario in my head, I realize that I had intended to use masonry construction adhesive under the slabs instead of a 3/8” bead on mortar. But now, I have one slab that I forced into place and both are now mortared in. What’s done is done, so I resigned to the fact that I’m just going to have to cut the whole top layer of fire bricks. I walked away and after 20 minutes, I decided to remove the slabs out and take out the mortar. In the moment, this was a huge pain in the ass, but would me save a ton of time with cutting bricks and risk damaging fire bricks that are $3.10 each!!!
Pulled the first slab and scraped off the mortar. Tried removing the jammed in slab and that thing was STUCK! Pulled out the pry bar and got enough clearance to squeeze in there with a flathead screwdriver and scrape off the mortar. Scraping away at a slab that’s propped up just high enough to fit my forearm in there and I dropped my screwdriver down into the hole under the slab.

Finished scraping and decided to hang this up for the day to regroup before making any more stupid moves. With one slab removed and the other stuck between the walls once again, I hear a loud “POP!!!” The pressure of the stuck slab broke the mortar joints… Thankfully, it was a clean break and could be easily repaired. Even though this was a HORRIBLE day from start to finish, I’m happy that it happened considering the fact that I had a damaged slab stuffed into place. Pulled out the damaged slab, destroyed it and started the process of pouring another slab. And I got my screwdriver back!

Moral of the story, stop when things start turning to S@#&! Hopefully this was an isolated day of horrible circumstances…
Moving on…
What an adventure! 
Thanks for sharing.
TIM
Thanks for sharing.
TIM
geoff7877
Full Fledged Farker
- Joined
- Feb 20, 2016
- Location
- Petaluma, CA
It’s a tell-all man! Can’t hide the bad stuff. Hopefully my mistakes will help someone else from making the same mistakes.What an adventure!
Thanks for sharing.
TIM
Last edited:
geoff7877
Full Fledged Farker
- Joined
- Feb 20, 2016
- Location
- Petaluma, CA
Back on track now.
I poured a new slab (lighter gray slab) and put it into place. I used a different concrete this time around. **To be clear, I’m not blaming the concrete in my little debacle.** Pure bonehead, Neanderthal moment on my part.
Instead of sakrete high strength, I used sakrete fast setting concrete. Both cure to 4000 PSI but high strength took about a week to get to the same stage that the fast setting was after 24 hours.
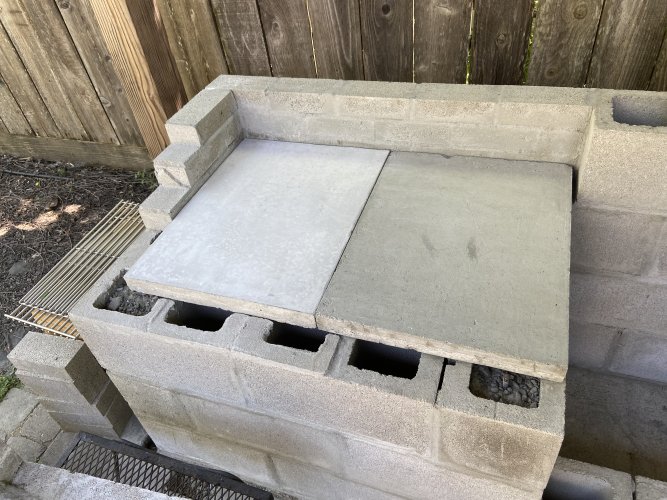
Repaired the wall after getting the slabs in place. The repair was pretty straight forward since it was a clean break and came off in one giant piece.
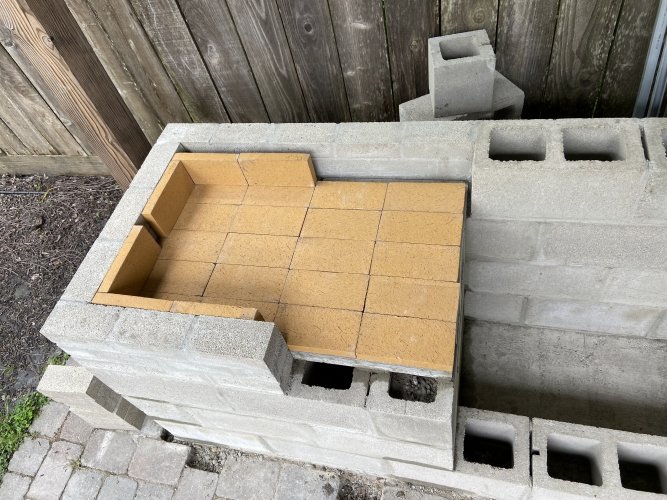
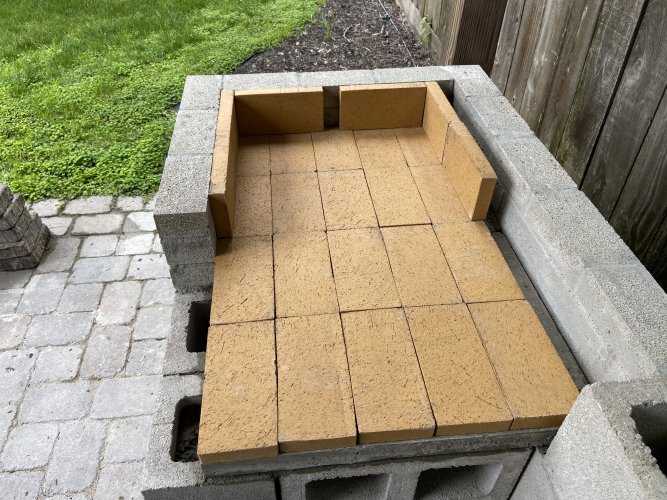
Below is a test fit of the base of fire bricks and the first row for the sides. The gap in the bricks along the side is where the frame will be for the Santa Maria. I’ll have to cut some of the bricks to allow for the wall slab that will run along where the open edge is pictured here to the right. I also poured a slab to fill the gap behind the fire bricks along the back wall.
Next step is to fill the gap in the wall in front and finish building up the final row of cinder blocks to complete structure. Also filling every corner and every fourth hole in the blocks with rebar and concrete for added strength.
I poured a new slab (lighter gray slab) and put it into place. I used a different concrete this time around. **To be clear, I’m not blaming the concrete in my little debacle.** Pure bonehead, Neanderthal moment on my part.
Instead of sakrete high strength, I used sakrete fast setting concrete. Both cure to 4000 PSI but high strength took about a week to get to the same stage that the fast setting was after 24 hours.

Repaired the wall after getting the slabs in place. The repair was pretty straight forward since it was a clean break and came off in one giant piece.
Below is a test fit of the base of fire bricks and the first row for the sides. The gap in the bricks along the side is where the frame will be for the Santa Maria. I’ll have to cut some of the bricks to allow for the wall slab that will run along where the open edge is pictured here to the right. I also poured a slab to fill the gap behind the fire bricks along the back wall.
Next step is to fill the gap in the wall in front and finish building up the final row of cinder blocks to complete structure. Also filling every corner and every fourth hole in the blocks with rebar and concrete for added strength.


Coming along nicely.
- Joined
- Apr 21, 2006
- Location
- Lake Ponderosa-Montezuma, IA
...And I got my screwdriver back!!!!!
Ed
Ed
geoff7877
Full Fledged Farker
- Joined
- Feb 20, 2016
- Location
- Petaluma, CA
Thank youComing along nicely.
geoff7877
Full Fledged Farker
- Joined
- Feb 20, 2016
- Location
- Petaluma, CA
Poor thing would’ve been locked up forever....And I got my screwdriver back!!!!!
Ed
Similar threads
- Replies
- 23
- Views
- 2K
- Replies
- 12
- Views
- 699


