Attempting to restore a Smokey Joe

BeerBQ

Knows what a fatty is.
Joined
May 20, 2013
Messages
161
Reaction score
77
Points
28
Location
Indiana
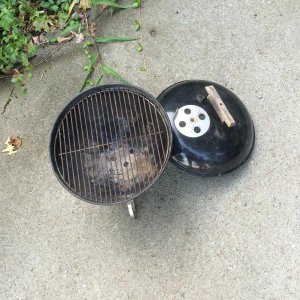
I picked up a Smokey Joe at a yard sale yesterday for $4. It is older and has a wooden handle, but other than that I'm not sure of the age. I straightened out the handle a bit and will sand/replace the wood parts of it. This is my first attempt at a restoration and I have run across a few issues:

1) Rust on the lid where the handle connects. Can I just sand this down and paint with grill paint?

2) Rust/chipping on the rim of the lid and rim of the body. I know not to paint the inside, but is this too close to be painted?

3) The bolts that attach the legs are rusted on. I used WD-40 and tapping both ends to try to loosen it but had no luck. The slot in the head seems to have softened and I've come close to stripping it. Is there any way to get these off? I'd like to take them off to sand and paint some rust where they meet and clean some rust of the legs.

Thanks for any advice.
IMG_0374.jpg
 
Scrape off the loose rust and treat with Ospho, then spot paint with high temp paint. Paint around the edge is ok.
Try some Kroil on the rusted up screws. If that don't work they will probably have to be ground off with a dremel tool(or similar) then replace with new hardware from your local hardware store.
This will be a nice little project and you will end up with a good cooker, just add a tamale pot to it for a mini smoker.
 
You should contact Marty Leach on here about a new handle! Nice project .
 
I don't understand spending time and money on a cooker that only costs $30, new.
 
Agree with above comments. I wouldn't mess around with those screws either. Cut em off and replace w/new, stainless if possible.
 
Possible you could somehow soak with Evapo-Rust....stuff works...

http://weberkettleclub.com/blog/2015/07/19/product-review-evapo-rust/

That's a nice old Smokey......handle's still in good shape, or like said, Marty's are top-notch.....
Interesting that it's a flat metal leg, but a wood handle.....late 80's~early 90's is a best guess......check here:

http://weberkettleclub.com/grills/weber-smokey-joe-history/

More on cleaning here:

http://weberkettleclub.com/

near the bottom of the page if it doesn't go there automatically.......sorry for pimpin' another site, but me & my Kettlhead buddies work pretty hard on the how-to's & history stuff so others may benefit......:becky:
 
Is the time investment really worth it? Man, I would hate to see someone spend hours on something just to save $26. If you're that set on it, then those screws should snap off if they're that rusted, and if you don't have a grinder/dremel tool. Other than that, like others have said, just sand it down a bit to rough it up, and put a couple good coats of Rustoleum. When it comes to the handle, just be creative, go to the dump/scrap yard and find something that works. Usually they just give the small stuff away for nothing.
 
I don't think restoring Webers is about saving $$. Some of them have dozens and it is just something they enjoy doing. May not make sense to everyone but...
 
A middle of the road approach would be to knock the loose rust off and spray the bare areas with Pam to protect them. That way you can cook on it while the debate here goes on.
 
you will have to grind those bolt heads off and replace them with new hardware, I had to do that on a restomod smokey joe, (put a 15 gallon drum on it to smoke on) so I wanted sturdier legs!
 
I don't think restoring Webers is about saving $$. Some of them have dozens and it is just something they enjoy doing. May not make sense to everyone but...

Nice observation.

Something isn't necessarily disposable solely because of $. At the least it's one less thing in a landfill.
 
They sell for $30? The guy said a new one would cost $75!

Just kidding. Not trying to save money. Like has been mentioned, I enjoy trying to bring something back.

I'll take a Dremel tool to grind off the bolts for the legs and may drill out the rivets on the vents. I'm leaning toward sanding down the handles a bit and using some oil to protect them.

I have paint for the outside, but is there another option other than Pam on the inside?

Thank you for all the advice!
 
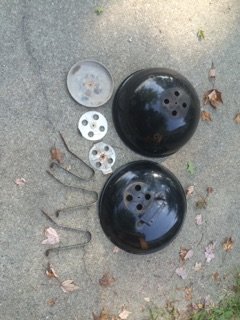
Got a little more work done. I drilled out the rivets on the vents, removed the legs, and separated the ash catcher. Both vents and the ash catcher are soaking in hot water and dish soap to remove some of the gunk before the heavy scrubbing and oven cleaner. I also picked up some stainless steel hardware to reassemble.

All the pieces ready for a new start.
IMG_0416.jpg

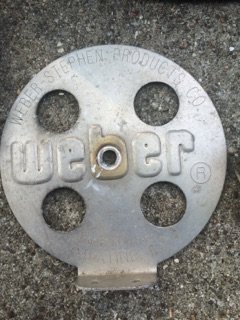
The exhaust. Says: "Weber-Stephen Products Co"
"Made in U.S.A"
"Palatine, IL"
Does this identify the year at all? I noticed my newer kettle and SJ have different wording.
IMG_0417.jpg


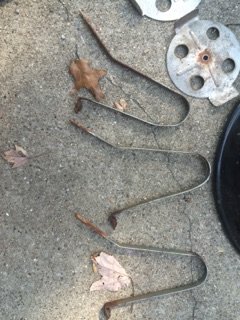
The legs need some work with bending and rust.
IMG_0418.jpg


Since cost has been mentioned, I'm $4 in on the grill and about $8 on hardware and 2-3 hours of work. But, it has all been fun to see it coming together so I'm not complaining.
 
Keep the pics coming, looking forward to the finished product.
 
I wouldn't even try to repaint - most paints really won't stick to that powder coat stuff Weber uses. Why not do what you are doing in cleaning up / replacing the hardware, then take it back inside when you are done cooking?
 
The exhaust. Says: "Weber-Stephen Products Co"
"Made in U.S.A"
"Palatine, IL"
Does this identify the year at all? I noticed my newer kettle and SJ have different wording.
There should be a one or two letter code (probably a single letter for this SJ) below the rivet hole. That code will tell you the year it was made.
Sand the handle and treat it with a couple coats of Watco Teak Oil finish.
You can paint the rusted areas with high temp paint, but your results may be less than expected.
For the SJs I have salvaged, I use stainless fender washers on the inside and outside of the bowl where the legs attach. I bend them a little so they are "cupped" and fit the profile of the bowl. Put the washer on a socket that's the same size as the washer. Place the head of a carriage bolt in the hole of the washer and hit it with a hammer to make it cup. It really adds strength and reinforces the leg mount. Use stainless bolts and a stainless jam nut to attach the legs and vents.
 
Back
Top