PatioDaddio
Babbling Farker
- Joined
- May 4, 2008
- Location
- Boise, Idaho
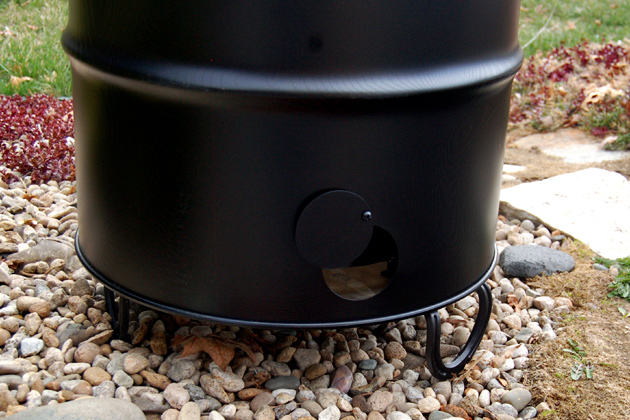
First Cook: Pit Barrel Cooker
I posted last weekend that I had received a Pit Barrel Cooker (PBC), and I
gave my initial thoughts. Well, the proof is obviously in the pudding, or the
meat in this case, so here I'll tell you about the maiden voyage.
I'd seen the videos on the Pit Barrel Cooker Company site that extolled the
virtues of chicken and tri-tip cooked on the PBC. Being a huge fan of both,
I decided that this would be a great first cook. Each are great barbecued
meats, but they are also sensitive to overcooking.
The PBC comes with a 4.7-ounce shaker bottle of each of their
"All-Purpose Pit Rub" and "Beef & Game Pit Rub" seasonings. I tasted the
rubs, and they seem well-suited to their advertised purposes. The
all-purpose rub was a little on the spicy side, but I love spicy.
For my first test cook I decided to use seasonings with which I am very
familiar. The thought here is that I would eliminate the added variable of
seasoning and focus on the cooking. I felt that it was important to start
from a somewhat known baseline of flavor profile.
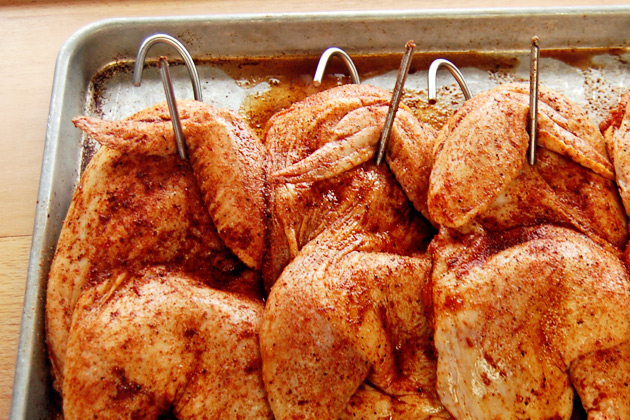
I started by splitting the chickens (4 1/2 lbs each), trimming the tri-tip
(about 3 1/2 lbs each), dusting all of the meat evenly (the chicken more
heavily) with seasoning, and refrigerating them for two hours.
Note: I inserted the hooks while the coals were starting.
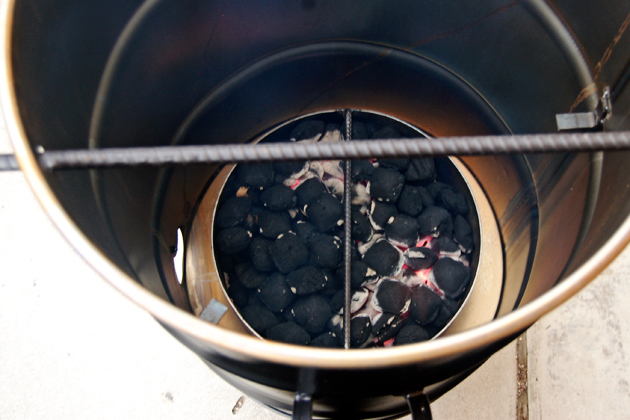
Next, per the instructions, I filled the charcoal basket level with Kingsford®
Original (blue bag) charcoal, doused it with Kingsford® lighter fluid, put it
on the PBC and lit it.
I'll admit that using lighter fluid is not as demonic as most of my barbecue
brothers would argue. However, letting it burn for only 20 minutes is a little
unsettling. In the future I'll light about a third of a chimney of coals outside
the cooker, let them ash over/gray, and then add them to the unlit coals in
the basket. That's the process that I use in my UDS cookers (a quasi-
Minion method).
Here's how the coals looked after 20 minutes.
The instructions indicated that the chicken would take somewhere
between two and 2 1/2 hours. The video at their site states that two
hours is fine for young or full-size chickens, but the instructions in the box
state 2 1/2 hours.
This left me wondering when to plan to add the tri-tip to the cooker. I
figured I'd just wing it (pardon the pun) the first time and try to time it by
internal temperature. I was cooking for another family and I had a set
delivery time, so I didn't have a lot of margin for error. This, by the way, is
not a good plan for a first cook on a new cooker.
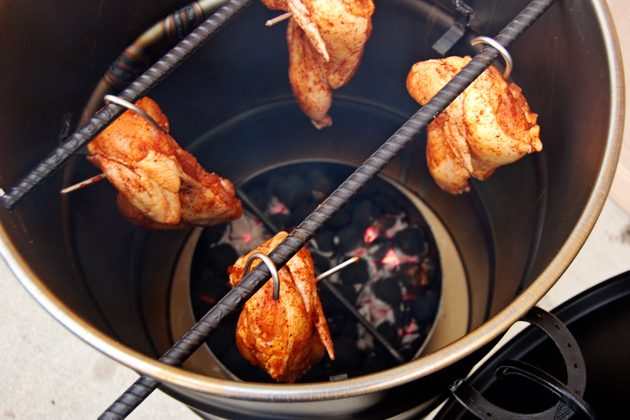
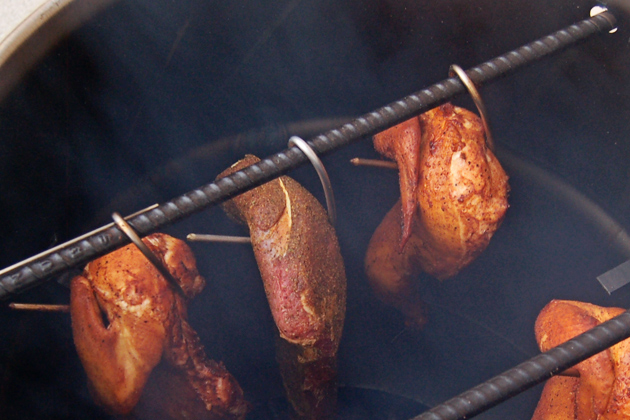
I let the chickens cook for about an hour and five minutes, then I added
the tri-tip.
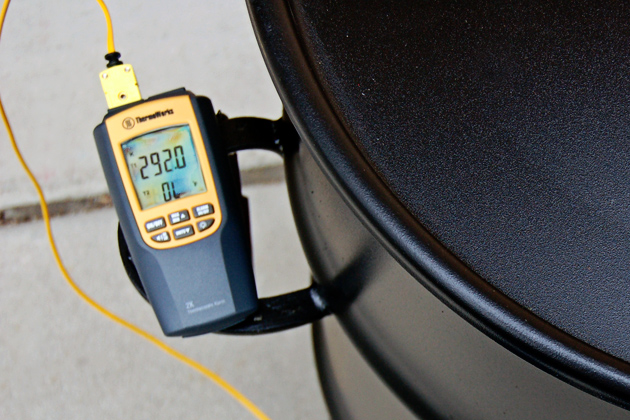
The way the PBC held an even temperature really impressed me. I stuck
the probe of my Thermoworks TW8060 in the hole next to one of the rods
and it held 290º +/- 10º for the entire cook and then some.
The chicken was done in an hour and forty minutes (165º breast/181º
thigh), and the tri-tip was done after only 35 minutes (135º in the thickest
portion). The chicken would have been way overcooked if I'd have followed
even the video instructions (two hours). I think that perhaps I was using
smaller chickens. I can see where a larger chicken (say 5 1/2 lbs, pre-trim)
would probably be just about perfect at two hours.
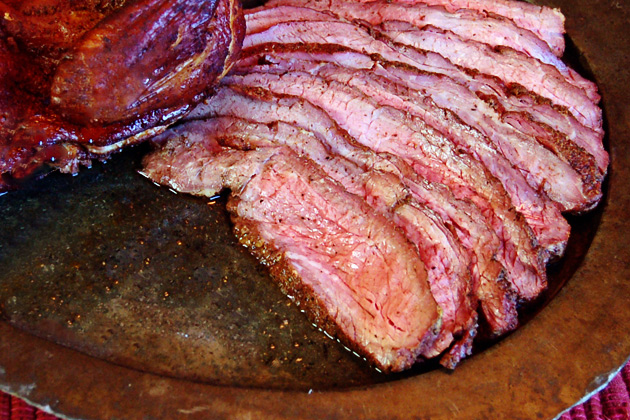
In the end, the PBC produced great results, despite a little bit of cooking
time cipherin' on my part. The tri-tip was just about edge-to-edge
perfectly medium-rare.
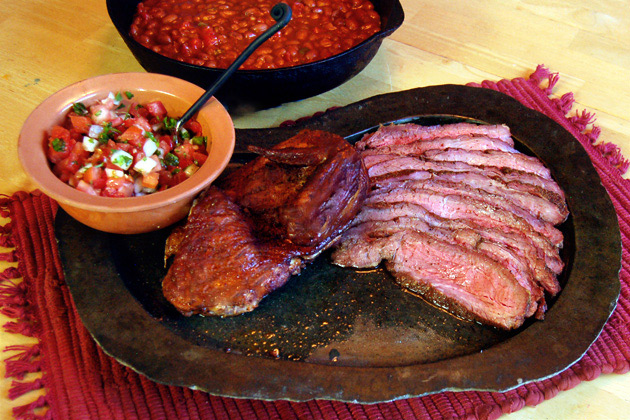
The chicken had great color and was generally moist and juicy, with
slightly crispy skin. Both my delivery family and I felt that the breast was
dry, but not so much that it was bad. We both thought the flavor was
outstanding all the way around.
Overall I felt that my first cook on the PBC met my lofty expectations. It
lived up to its set-and-forget goal, and the results were great. Of course
there is always a learning curve with any new cooker, and I greatly look
forward to putting this thing through its paces.
Here are some notes that I made throughout the cook:
John
I posted last weekend that I had received a Pit Barrel Cooker (PBC), and I
gave my initial thoughts. Well, the proof is obviously in the pudding, or the
meat in this case, so here I'll tell you about the maiden voyage.
I'd seen the videos on the Pit Barrel Cooker Company site that extolled the
virtues of chicken and tri-tip cooked on the PBC. Being a huge fan of both,
I decided that this would be a great first cook. Each are great barbecued
meats, but they are also sensitive to overcooking.
The PBC comes with a 4.7-ounce shaker bottle of each of their
"All-Purpose Pit Rub" and "Beef & Game Pit Rub" seasonings. I tasted the
rubs, and they seem well-suited to their advertised purposes. The
all-purpose rub was a little on the spicy side, but I love spicy.
For my first test cook I decided to use seasonings with which I am very
familiar. The thought here is that I would eliminate the added variable of
seasoning and focus on the cooking. I felt that it was important to start
from a somewhat known baseline of flavor profile.
I started by splitting the chickens (4 1/2 lbs each), trimming the tri-tip
(about 3 1/2 lbs each), dusting all of the meat evenly (the chicken more
heavily) with seasoning, and refrigerating them for two hours.
Note: I inserted the hooks while the coals were starting.
Next, per the instructions, I filled the charcoal basket level with Kingsford®
Original (blue bag) charcoal, doused it with Kingsford® lighter fluid, put it
on the PBC and lit it.
I'll admit that using lighter fluid is not as demonic as most of my barbecue
brothers would argue. However, letting it burn for only 20 minutes is a little
unsettling. In the future I'll light about a third of a chimney of coals outside
the cooker, let them ash over/gray, and then add them to the unlit coals in
the basket. That's the process that I use in my UDS cookers (a quasi-
Minion method).
Here's how the coals looked after 20 minutes.
The instructions indicated that the chicken would take somewhere
between two and 2 1/2 hours. The video at their site states that two
hours is fine for young or full-size chickens, but the instructions in the box
state 2 1/2 hours.
This left me wondering when to plan to add the tri-tip to the cooker. I
figured I'd just wing it (pardon the pun) the first time and try to time it by
internal temperature. I was cooking for another family and I had a set
delivery time, so I didn't have a lot of margin for error. This, by the way, is
not a good plan for a first cook on a new cooker.
I let the chickens cook for about an hour and five minutes, then I added
the tri-tip.
The way the PBC held an even temperature really impressed me. I stuck
the probe of my Thermoworks TW8060 in the hole next to one of the rods
and it held 290º +/- 10º for the entire cook and then some.
The chicken was done in an hour and forty minutes (165º breast/181º
thigh), and the tri-tip was done after only 35 minutes (135º in the thickest
portion). The chicken would have been way overcooked if I'd have followed
even the video instructions (two hours). I think that perhaps I was using
smaller chickens. I can see where a larger chicken (say 5 1/2 lbs, pre-trim)
would probably be just about perfect at two hours.
In the end, the PBC produced great results, despite a little bit of cooking
time cipherin' on my part. The tri-tip was just about edge-to-edge
perfectly medium-rare.
The chicken had great color and was generally moist and juicy, with
slightly crispy skin. Both my delivery family and I felt that the breast was
dry, but not so much that it was bad. We both thought the flavor was
outstanding all the way around.
Overall I felt that my first cook on the PBC met my lofty expectations. It
lived up to its set-and-forget goal, and the results were great. Of course
there is always a learning curve with any new cooker, and I greatly look
forward to putting this thing through its paces.
Here are some notes that I made throughout the cook:
- The side handles stay cool enough to rest your thermometer on.
- The lid handle stays at about body temperature.
- The feet stay cool to the touch.
John