Who here has built their own cabinet style smoker? (Pics inside)

Toronto

Knows what a fatty is.
Joined
Sep 12, 2012
Messages
106
Reaction score
45
Points
0
Location
Toronto
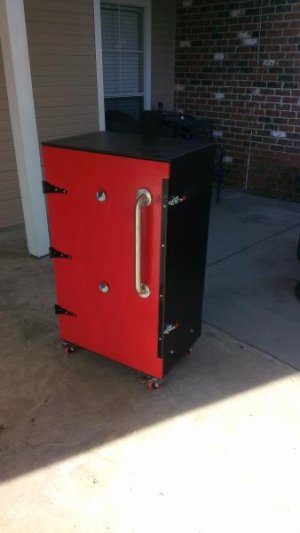
Hi guys, I was thinking of making one of these things as a project and would like input from others who have built their own. What upgrades would you make if you were to build it over again?

Im not sure if my design will work efficiently but here it is:

Parts needed

You will need square hollow bar:
2vkg7c0.png


You will need sheet metal:
2mwgx77.png


You will need some angle bar:
jkahpy.png


So now that we have are parts list lets build!

First we are going to build the left side wall. Here is the basic frame with some hollow bar.

12x1x1 = 2
29x1x1 = 2

2dkgtbr.png


Next we add sheet metal to both sides.

2wly2xg.png


Now we cut out the holes for the smoke channel from the fire chamber to the smoke chamber.
2r71oci.png


That’s it!

We have now completed the left wall and will repeat the process to create the right wall. We then build the top and bottom the same way except we do not cut holes and then we join it all together like this.

e9byhz.png


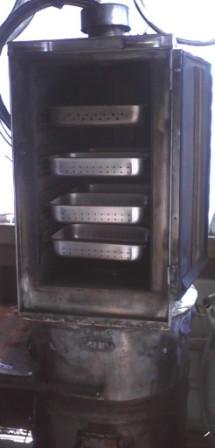
We now add the middle section to partition the firebox from the smoke chamber.
2q8odb5.png


Next we add shelves made with angle bars.

k3x069.png


Next we add a sheet metal back wall and attach the smoke stack. Five circular holes were cut in the smoke stack and the sheet metal backing to create an exhaust. I added two pics so you can see it from the front and the back. Im thinking a fence post would be ideal for the smoke stack?

rcluef.jpg
33tj6vk.png


Now we build a frame for the insulation around what we have already built with some angle bar.
2lcsr6e.png
s611k5.png


Next we wrap the top, sides, back and bottom with insulation. Then we cap the angle bars with more sheet metal.
2mrif7a.png
2re4j7n.png


Now we make doors for the fire chamber and the smoke chamber, we use the same method we used for making the walls, they will sit flush on the inner frame.
2aepjxv.png


So there it is, what do you guys think?

Will it work?

Im really interested in critique from people who have built their own but any useful input would be appreciated.
 
Last edited:
I "built" one of a similar style, but with different materials and some design differences. I say "built" because I have no welding skill. I designed it, paid for the materials and paid a good friend for his help. I helped with each step, but he absolutely built it (with some design changes).

Main difference in mine and your design is the location of the smoke stack. Mine's right on top and in the middle.
Also, there are no holes for the fire box. All the air comes in by leaving the fire box door slightly open.
Also, it's not insulated. It's 10 gauge steel.
It's only got 4 grate, 7 inches apart (each rate is 29x23)
We might make some changes later, but it works well as designed.

For some reason, I don't have a pic, but there's really thick steel diffuser between the fire box and chamber, with 1.5" gap all around.

The firebox is probably a little small and the vent/smoke stack situation leads to some uneven heating, but it's very efficient for the size. I'm very happy with it, but it does need more fuel every few hours and things need to be rotated on bigger smokes.

Here are some pics (you probably have to click on the title of each one to see it).
[ame="http://www.flickr.com/photos/40611072@N05/8296101197/"]Untitled | Flickr - Photo Sharing![/ame]
[ame="http://www.flickr.com/photos/40611072@N05/8026816192/"]Firebox | Flickr - Photo Sharing![/ame]
[ame="http://www.flickr.com/photos/40611072@N05/8274393725/"]. | Flickr - Photo Sharing![/ame]
[ame="http://www.flickr.com/photos/40611072@N05/8329006671/"]Untitled | Flickr - Photo Sharing![/ame]
[ame="http://www.flickr.com/photos/40611072@N05/7867863644/"]Smoker. 8-25-12 | Flickr - Photo Sharing![/ame]
[ame="http://www.flickr.com/photos/40611072@N05/7575820556/"]Smoker1 | Flickr - Photo Sharing![/ame]
[ame="http://www.flickr.com/photos/40611072@N05/7867866900/"]Grates | Flickr - Photo Sharing![/ame]
 
I'm not a builder or an engineer, but you might clarify for me: your fire is in the bottom section, heat and smoke pass through the holes in both sides up through the air gap left between the skins and into the cook chamber, is that correct? My only thought would be the upper holes are high in the cook chamber, heat rises, so I would think it would be hard to get temp in the bottom of the cook chamber, unless it has radiant heat from the divider between the chambers that you are factoring in. Other than that it is an interesting design, but looks like a lot of sheet metal needed, 3 layers on each side correct?
 
I see no intake vents or control, and I wonder how you will deal with grease and drippings?
Dave
 
looks nice on paper but very incomplete.

along with the questions already asked, how do you deal with the fire in the firebox? It just sits in the bottom of the box? No grate, no airflow underneath?

I cant see this working.
 
I "built" one of a similar style, but with different materials and some design differences. I say "built" because I have no welding skill. I designed it, paid for the materials and paid a good friend for his help. I helped with each step, but he absolutely built it (with some design changes).

Main difference in mine and your design is the location of the smoke stack. Mine's right on top and in the middle.
Also, there are no holes for the fire box. All the air comes in by leaving the fire box door slightly open.
Also, it's not insulated. It's 10 gauge steel.
It's only got 4 grate, 7 inches apart (each rate is 29x23)
We might make some changes later, but it works well as designed.

For some reason, I don't have a pic, but there's really thick steel diffuser between the fire box and chamber, with 1.5" gap all around.

The firebox is probably a little small and the vent/smoke stack situation leads to some uneven heating, but it's very efficient for the size. I'm very happy with it, but it does need more fuel every few hours and things need to be rotated on bigger smokes.

Here are some pics (you probably have to click on the title of each one to see it).
Untitled | Flickr - Photo Sharing!
Firebox | Flickr - Photo Sharing!
. | Flickr - Photo Sharing!
Untitled | Flickr - Photo Sharing!
Smoker. 8-25-12 | Flickr - Photo Sharing!
Smoker1 | Flickr - Photo Sharing!
Grates | Flickr - Photo Sharing!

To be honest my design is based off the Backwoods chubby smoker, its reverse flow so thats why the smoke stack is the way it is, along with the channeled walls.

Good idea about putting a thick steel diffuser in the middle partition, I might insulate it as well.

Ratio wise, how big is your firebox to your smoke chamber? I went with 1:2 thinking that was the best but its just a stab in the dark.

Great pics!

This may be one of the best builds out there. Plans are posted further down in the post.

http://www.smokingmeatforums.com/t/93785/backwoods-style-build

Here is another good build.

http://www.smoked-meat.com/forum/showthread.php?t=14275

Wow, great links, thanks for the info!

I like his design with the extra two channels in the back wall, I will incorporate that into my second design. Im thinking about changing the circular holes to rectangular holes for more airflow.

I'm not a builder or an engineer, but you might clarify for me: your fire is in the bottom section, heat and smoke pass through the holes in both sides up through the air gap left between the skins and into the cook chamber, is that correct? My only thought would be the upper holes are high in the cook chamber, heat rises, so I would think it would be hard to get temp in the bottom of the cook chamber, unless it has radiant heat from the divider between the chambers that you are factoring in. Other than that it is an interesting design, but looks like a lot of sheet metal needed, 3 layers on each side correct?

Im neither a builder or an engineer, just some guy trying to build a smoker for fun. Yes, you got it exactly right, its designed to be a reverse flow smoker and the reason for the exhaust holes being high is I want to put a water pan/drip pan there. The 3 sided sheet metal is necessary for a smoke channel plus an insulation channel on the side and back walls, it isnt necessary on the top or the bottom so I might remove some sheet metal there.

I see no intake vents or control, and I wonder how you will deal with grease and drippings?
Dave

Good eye, I havent decided where I want to put a 3/4" pipe for my draft controller, it seems the popular spot is on the right wall but im thinking that might mess with the smoke channel.

Grease and drippings will fall into the water pan/drippings pan that I couldnt draw, im still new with this Sketchup program and its proving to be difficult. I have seen on the forum an upgrade for the Humphrey smokers is a sheet of metal to block dripping from falling when you open the door like this:

attachment.php


looks nice on paper but very incomplete.

along with the questions already asked, how do you deal with the fire in the firebox? It just sits in the bottom of the box? No grate, no airflow underneath?

I cant see this working.

Im thinking of lining the firebox in a thicker gauge steel to extend the life of the smoker, I would be making a removable charcoal basket but havent decided on the design yet, im looking around for inspiration. If you look in the firebox chamber you will see I put some angle bar in there for the charcoal basket that I havent designed yet.
 
Have you looked at absbbq.com , the bar be cube then look at pics of it. I like mine ,it turns out good Q . If the racks were a couple inches farther apart it would be better.you might get ideals from it.
 
Have you looked at absbbq.com , the bar be cube then look at pics of it. I like mine ,it turns out good Q . If the racks were a couple inches farther apart it would be better.you might get ideals from it.

Interesting stuff, they have a lot of pics, it looks as though they have tuning plates in there?

I think ive seen those made for an offsets somewhere on this forum.


Ive made some changes to the design.

1. I still build the wall the same except I don’t add the sheet metal with the circular holes cut it in. Instead, I have opted for a sheet metal on the top and a thicker gauge sheet metal for the firebox(the thicker gauge stuff is signified with the diamond plate pattern).

2. I changed the holes to a square instead of circle.

3. I have added a back channel to the smoker.

4. I have lined the firebox with thick gauge steel.

5. I have increased the partition to 2x1x1 from 1x1x1 so I can have room for some insulation.

6. I have removed 1 piece of sheet metal from the top section.

I think with this new design airflow should be greatly increased with the extra channel in the back wall.

28k0fmd.png
214av5d.png
zkplhf.png


I still need to add some bars for the casters to go on the bottom.

Cut a hole for the temperature controller intake.

Design a charcoal basket.
 
I like the improvements. However, smokers such as a Backwoods do not have specific heat channel dimensions by accident. The lower opening for the heat to enter the wall, the top opening for the heat to enter the cook chamber, and the opening to the exhaust stack are all critical to the operation of the cooker. Miscalculation in these areas will result in stagnated air flow and creosote food, or a free flow environment resulting in long cook times. I would be very careful in determining your measurements.
 
planning on using a water pan? and if you didn't want to go with reverse flow, you could always do something similar to gator pits with the dual stacker exhaust. it's one of the few cabinet smokers that has even temps top to bottom...all the reverse flows that I've seen has about a 30 degree higher temp at top rack. I built one that is not reverse flow and mine actually shows a 30 degree higher temp on the bottom rack than the top according to the door thermos. I just got some oven thermos that I plan on trying to see what the inside of the racks actually are. Also, making sure that your smoker is pretty airtight definitely helps. If you can't control your air intake properly, you'll probably have to use a water pan for sure to keep the temp from spiking. I'm sure you know all this, but thought i'd throw it out there just in case. Good luck, keep us posted.
 
I designed this cooker last winter & had a local welding shop fabricate it. Overall it's 48" tall and 36"x36" square. The firebox has a slide out basket for the charcoal/wood. It's framed with 1.5" square tubing with mineral wool insulation. The firebox portion of the cabinet is ~12" tall. I considered building a gravity flow but decided to go this route instead. Glad I did! Less expensive and it works really, really well. Mounted on the trailer I have ~$2,700 invested in it. Here are a few pics. Cheers!!!


i designed this cooker last winter & had a local welding shop fabricate it. Overall it's 48" tall and 36"x36" square. The firebox has a slide out basket for the charcoal/wood. It's framed with 1.5" square tubing with mineral wool insulation. The firebox portion of the cabinet is ~12" tall. I considered building a gravity flow but decided to go this route instead. Glad i did! Less expensive and it works really, really well. Mounted on the trailer i have ~$2,700 invested in it. Here are a few pics. Cheers!!!


awesome!!!
 
Here's mine on the outside. I have zero welding experience so I had to get creative or spend big $$$. It's made of hardie backer board. I'm not the first to come up with this, but tweaked it to my liking. So far, so very good.
 

Attachments

  • IMAG0264.jpg
    IMAG0264.jpg
    19.7 KB · Views: 133
Back
Top